- Sort Score
- Num 10 results
- Language All
Results 591 - 600 of 1,058 for png (0.01 seconds)
-
docs/ko/docs/advanced/additional-responses.md
## 주요 응답에 대한 추가 미디어 타입 { #additional-media-types-for-the-main-response }

같은 `responses` 파라미터를 사용해 동일한 주요 응답에 대해 다른 미디어 타입을 추가할 수도 있습니다.

예를 들어, *경로 처리*가 JSON 객체(미디어 타입 `application/json`) 또는 PNG 이미지(미디어 타입 `image/png`)를 반환할 수 있다고 선언하기 위해 `image/png`라는 추가 미디어 타입을 추가할 수 있습니다:

{* ../../docs_src/additional_responses/tutorial002_py310.py hl[17:22,26] *}

/// note | 참고

이미지는 `FileResponse`를 사용해 직접 반환해야 한다는 점에 유의하세요.

///
Created: Sun Apr 05 07:19:11 GMT 2026 - Last Modified: Fri Mar 20 14:06:26 GMT 2026 - 9.6K bytes - Click Count (0) -
docs/ru/docs/features.md
 * Альтернативная документация API в [**ReDoc**](https://github.com/Rebilly/ReDoc).  ### Только современный Python { #just-modern-python }Created: Sun Apr 05 07:19:11 GMT 2026 - Last Modified: Thu Mar 19 17:56:20 GMT 2026 - 15.5K bytes - Click Count (0) -
docs/es/docs/tutorial/debugging.md
Luego, iniciará el servidor con tu código **FastAPI**, deteniéndose en tus puntos de interrupción, etc.

Así es como podría verse:

<img src="/img/tutorial/debugging/image01.png">

---

Si usas PyCharm, puedes:

* Abrir el menú "Run".
* Seleccionar la opción "Debug...".
* Luego aparece un menú contextual.
* Selecciona el archivo para depurar (en este caso, `main.py`).
Created: Sun Apr 05 07:19:11 GMT 2026 - Last Modified: Thu Mar 19 18:15:55 GMT 2026 - 2.6K bytes - Click Count (0) -
docs/ru/docs/advanced/sub-applications.md
<img src="/img/tutorial/sub-applications/image01.png">

Затем откройте документацию для подприложения по адресу [http://127.0.0.1:8000/subapi/docs](http://127.0.0.1:8000/subapi/docs).

Вы увидите автоматическую документацию API для подприложения, включающую только его собственные _операции пути_, все под корректным префиксом подпути `/subapi`:

<img src="/img/tutorial/sub-applications/image02.png">
Created: Sun Apr 05 07:19:11 GMT 2026 - Last Modified: Thu Mar 19 17:56:20 GMT 2026 - 4.6K bytes - Click Count (0) -
docs/ru/docs/tutorial/debugging.md
Это запустит сервер с вашим **FastAPI** кодом, остановится на точках останова, и т.д.

Вот как это может выглядеть:

<img src="/img/tutorial/debugging/image01.png">

---

Если используете PyCharm, вы можете выполнить следующие шаги:

* Открыть "Run" меню.
* Выбрать опцию "Debug...".
* Затем в появившемся контекстном меню.
Created: Sun Apr 05 07:19:11 GMT 2026 - Last Modified: Thu Mar 19 17:56:20 GMT 2026 - 3.8K bytes - Click Count (0) -
docs/bucket/versioning/README.md
This protects against accidental overwrites or deletes of objects, allows previous versions to be retrieved. When you DELETE an object, all versions remain in the bucket and MinIO adds a delete marker, as shown below: 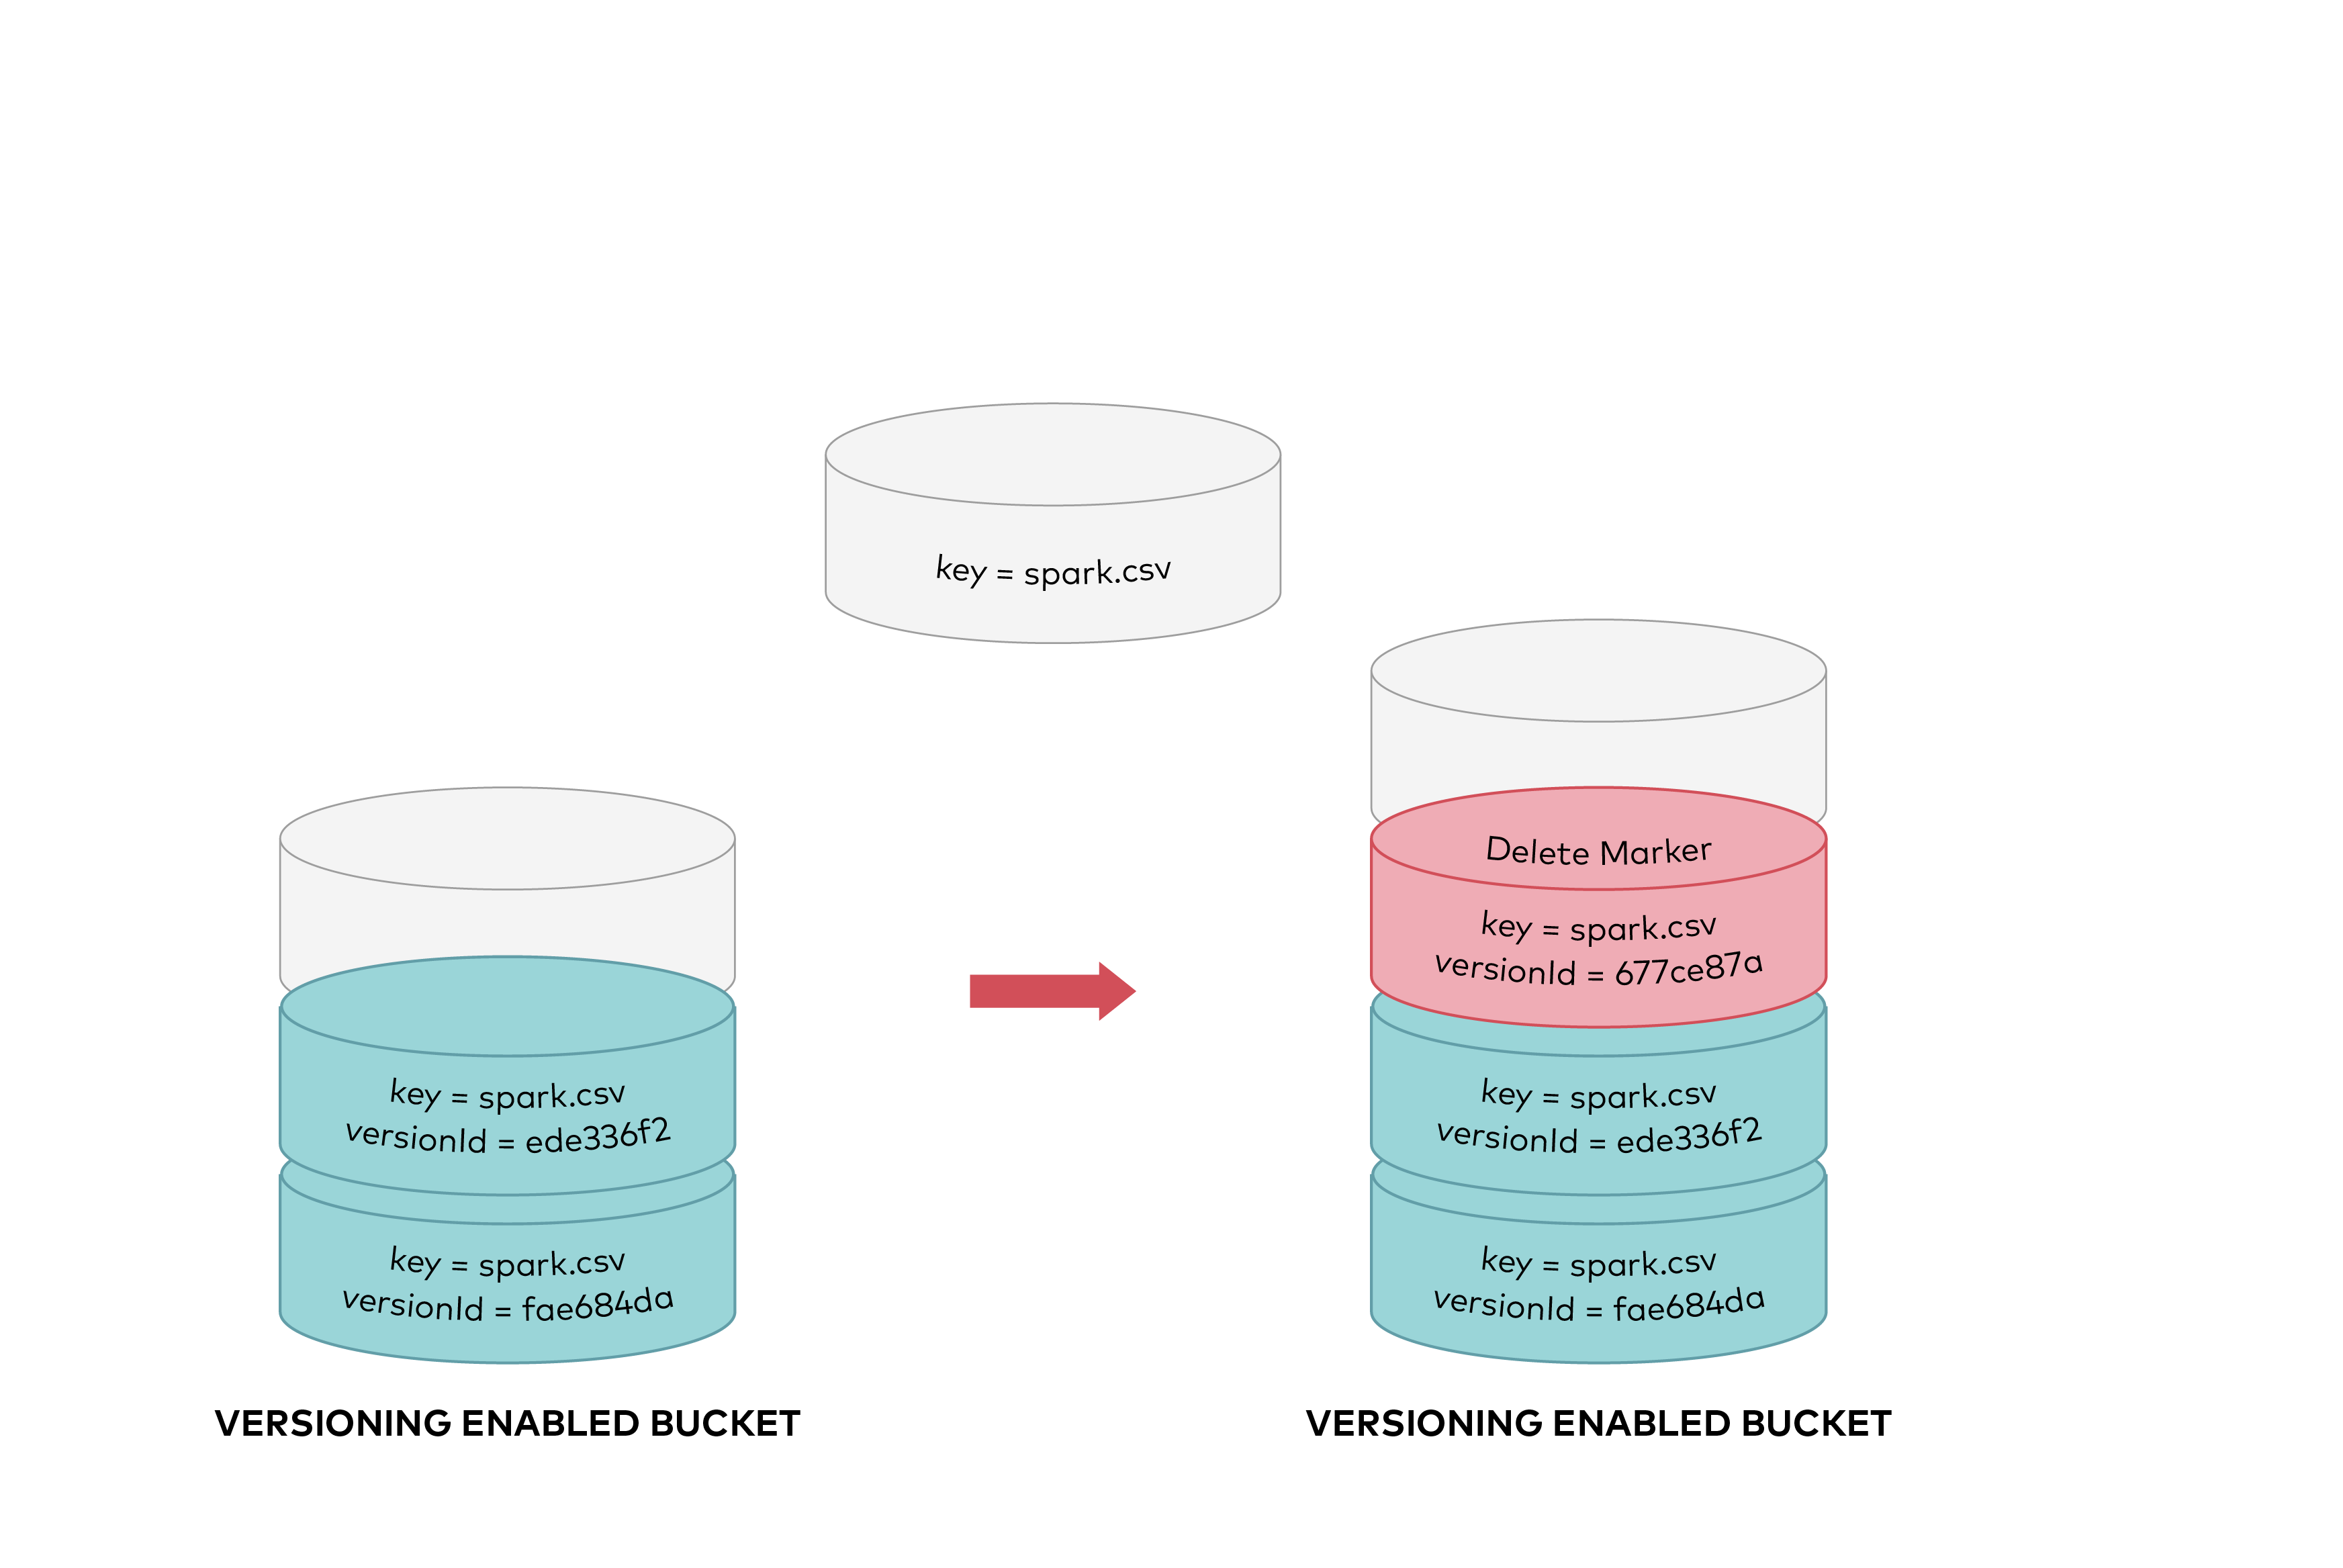
Created: Sun Apr 05 19:28:12 GMT 2026 - Last Modified: Tue Aug 12 18:20:36 GMT 2025 - 12K bytes - Click Count (0) -
docs/fr/docs/python-types.md
Au même moment, vous essayez de déclencher l'autocomplétion avec `Ctrl+Espace` et vous voyez :

<img src="/img/python-types/image02.png">

Avec cela, vous pouvez faire défiler en voyant les options, jusqu'à trouver celle qui « vous dit quelque chose » :

<img src="/img/python-types/image03.png">

## Plus de motivation { #more-motivation }

Regardez cette fonction, elle a déjà des annotations de type :
Created: Sun Apr 05 07:19:11 GMT 2026 - Last Modified: Thu Mar 19 18:37:13 GMT 2026 - 12.7K bytes - Click Count (0) -
docs/uk/docs/advanced/additional-responses.md
Можна використати цей самий параметр `responses`, щоб додати різні типи медіа для тієї ж основної відповіді.

Наприклад, можна додати додатковий тип медіа `image/png`, оголосивши, що ваша операція шляху може повертати JSON-об'єкт (з типом медіа `application/json`) або PNG-зображення:

{* ../../docs_src/additional_responses/tutorial002_py310.py hl[17:22,26] *}

/// note | Примітка
Created: Sun Apr 05 07:19:11 GMT 2026 - Last Modified: Thu Mar 19 18:27:41 GMT 2026 - 11.7K bytes - Click Count (0) -
docs/uk/docs/features.md
 * Альтернативна документація API за допомогою [**ReDoc**](https://github.com/Rebilly/ReDoc).  ### Лише сучасний Python { #just-modern-python }Created: Sun Apr 05 07:19:11 GMT 2026 - Last Modified: Thu Mar 19 18:27:41 GMT 2026 - 15.1K bytes - Click Count (0) -
docs/ru/docs/advanced/additional-responses.md
Например, вы можете добавить дополнительный тип содержимого `image/png`, объявив, что ваша операция пути может возвращать JSON‑объект (с типом содержимого `application/json`) или PNG‑изображение:

{* ../../docs_src/additional_responses/tutorial002_py310.py hl[17:22,26] *}

/// note | Примечание
Created: Sun Apr 05 07:19:11 GMT 2026 - Last Modified: Thu Mar 19 17:56:20 GMT 2026 - 12.2K bytes - Click Count (0)