- Sort Score
- Num 10 results
- Language All
Results 311 - 320 of 1,058 for png (0.07 seconds)
-
src/archive/zip/testdata/test-trailing-junk.zip
test.txt This is a test text file. gophercolor16x16.png...
Created: Tue Apr 07 11:13:11 GMT 2026 - Last Modified: Mon Sep 08 04:08:51 GMT 2014 - 1.2K bytes - Click Count (0) -
docs/en/docs/tutorial/metadata.md
/// tip

You can write Markdown in the `description` field and it will be rendered in the output.

///

With this configuration, the automatic API docs would look like:

<img src="/img/tutorial/metadata/image01.png">

## License identifier { #license-identifier }

Since OpenAPI 3.1.0 and FastAPI 0.99.0, you can also set the `license_info` with an `identifier` instead of a `url`.

For example:
Created: Sun Apr 05 07:19:11 GMT 2026 - Last Modified: Thu Mar 05 18:13:19 GMT 2026 - 5.8K bytes - Click Count (0) -
docs/zh/docs/python-types.md
在同样的位置,你用 `Ctrl+Space` 触发自动补全,就能看到:

<img src="/img/python-types/image02.png">

这样,你可以滚动查看选项,直到找到那个“看着眼熟”的:

<img src="/img/python-types/image03.png">

## 更多动机 { #more-motivation }

看这个已经带有类型提示的函数:

{* ../../docs_src/python_types/tutorial003_py310.py hl[1] *}

因为编辑器知道变量的类型,你不仅能得到补全,还能获得错误检查:

<img src="/img/python-types/image04.png">

现在你知道需要修复它,用 `str(age)` 把 `age` 转成字符串:
Created: Sun Apr 05 07:19:11 GMT 2026 - Last Modified: Fri Mar 20 17:06:37 GMT 2026 - 10.6K bytes - Click Count (0) -
docs/ja/docs/advanced/sub-applications.md
メインアプリ用の自動 API ドキュメントが表示され、そのアプリ自身の path operation のみが含まれます:

<img src="/img/tutorial/sub-applications/image01.png">

次に、サブアプリケーションのドキュメント [http://127.0.0.1:8000/subapi/docs](http://127.0.0.1:8000/subapi/docs) を開きます。

サブアプリケーション用の自動 API ドキュメントが表示され、そのアプリ自身の path operation のみが、正しいサブパス接頭辞 `/subapi` の下で表示されます:

<img src="/img/tutorial/sub-applications/image02.png">

どちらの UI でも操作すれば正しく動作します。ブラウザがそれぞれのアプリ/サブアプリと通信できるためです。
Created: Sun Apr 05 07:19:11 GMT 2026 - Last Modified: Fri Mar 20 14:07:17 GMT 2026 - 3.5K bytes - Click Count (0) -
docs/ja/docs/tutorial/debugging.md
以下の様な画面になります:

<img src="/img/tutorial/debugging/image01.png">

---

Pycharmを使用する場合、次のことが可能です:

* 「実行」メニューをオープン。
* オプション「デバッグ...」を選択。
* 次にコンテキストメニューが表示される。
* デバッグするファイル (ここでは `main.py`) を選択。

すると、**FastAPI** コードでサーバーが起動され、ブレークポイントで停止したりするでしょう。

以下の様な画面になります:
Created: Sun Apr 05 07:19:11 GMT 2026 - Last Modified: Fri Mar 20 14:07:17 GMT 2026 - 3.1K bytes - Click Count (0) -
docs/zh-hant/docs/tutorial/security/oauth2-jwt.md
Created: Sun Apr 05 07:19:11 GMT 2026 - Last Modified: Fri Mar 20 17:05:38 GMT 2026 - 10.1K bytes - Click Count (0) -
docs/zh/docs/tutorial/security/oauth2-jwt.md
Created: Sun Apr 05 07:19:11 GMT 2026 - Last Modified: Fri Mar 20 17:06:37 GMT 2026 - 10.1K bytes - Click Count (0) -
src/main/java/jcifs/smb1/util/mime.map
image/gif                      gif              # GIF image file
image/ief                      ief              # Image Exchange
image/jpeg                     jpeg jpg jpe     # JPG image file
image/png                      png              # Portable Network Graphics
image/tiff                     tiff tif         # TIFF image file
image/x-cmu-raster             ras              #
image/x-portable-anymap        pnm              #
Created: Sun Apr 05 00:10:12 GMT 2026 - Last Modified: Fri Mar 22 20:39:42 GMT 2019 - 5.9K bytes - Click Count (0) -
docs/en/docs/tutorial/response-status-code.md
///

It will:

* Return that status code in the response.
* Document it as such in the OpenAPI schema (and so, in the user interfaces):

<img src="/img/tutorial/response-status-code/image01.png">

/// note

Some response codes (see the next section) indicate that the response does not have a body.

FastAPI knows this, and will produce OpenAPI docs that state there is no response body.

///
Created: Sun Apr 05 07:19:11 GMT 2026 - Last Modified: Thu Mar 05 18:13:19 GMT 2026 - 3.9K bytes - Click Count (0) -
docs/ru/docs/index.md
### Альтернативная документация API { #alternative-api-docs } Теперь откройте [http://127.0.0.1:8000/redoc](http://127.0.0.1:8000/redoc). Вы увидите альтернативную автоматическую документацию (предоставлена [ReDoc](https://github.com/Rebilly/ReDoc)): 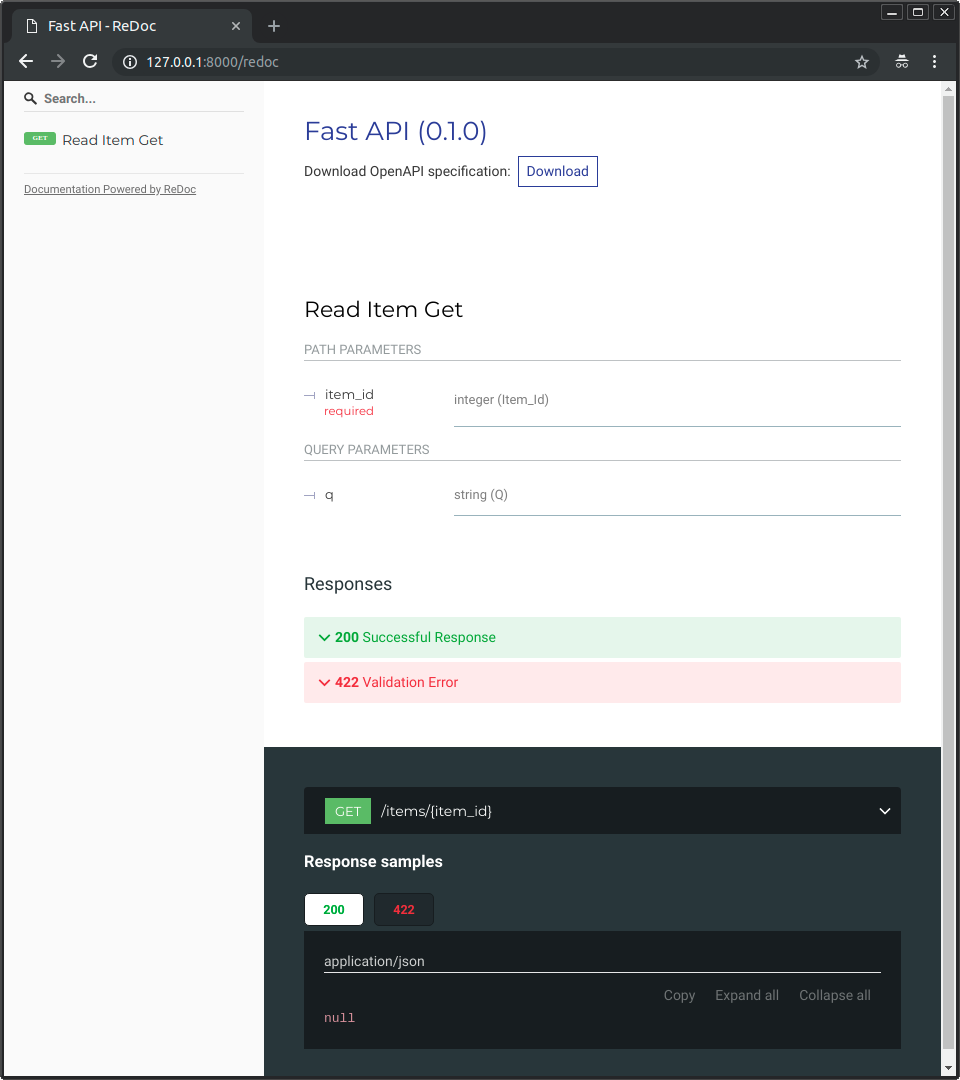 ## Пример обновления { #example-upgrade }Created: Sun Apr 05 07:19:11 GMT 2026 - Last Modified: Thu Mar 19 17:56:20 GMT 2026 - 30.4K bytes - Click Count (0)