- Sort Score
- Num 10 results
- Language All
Results 201 - 210 of 412 for INSTALL (0.04 seconds)
The search processing time has exceeded the limit. The displayed results may be partial.
-
docs/bucket/quota/README.md
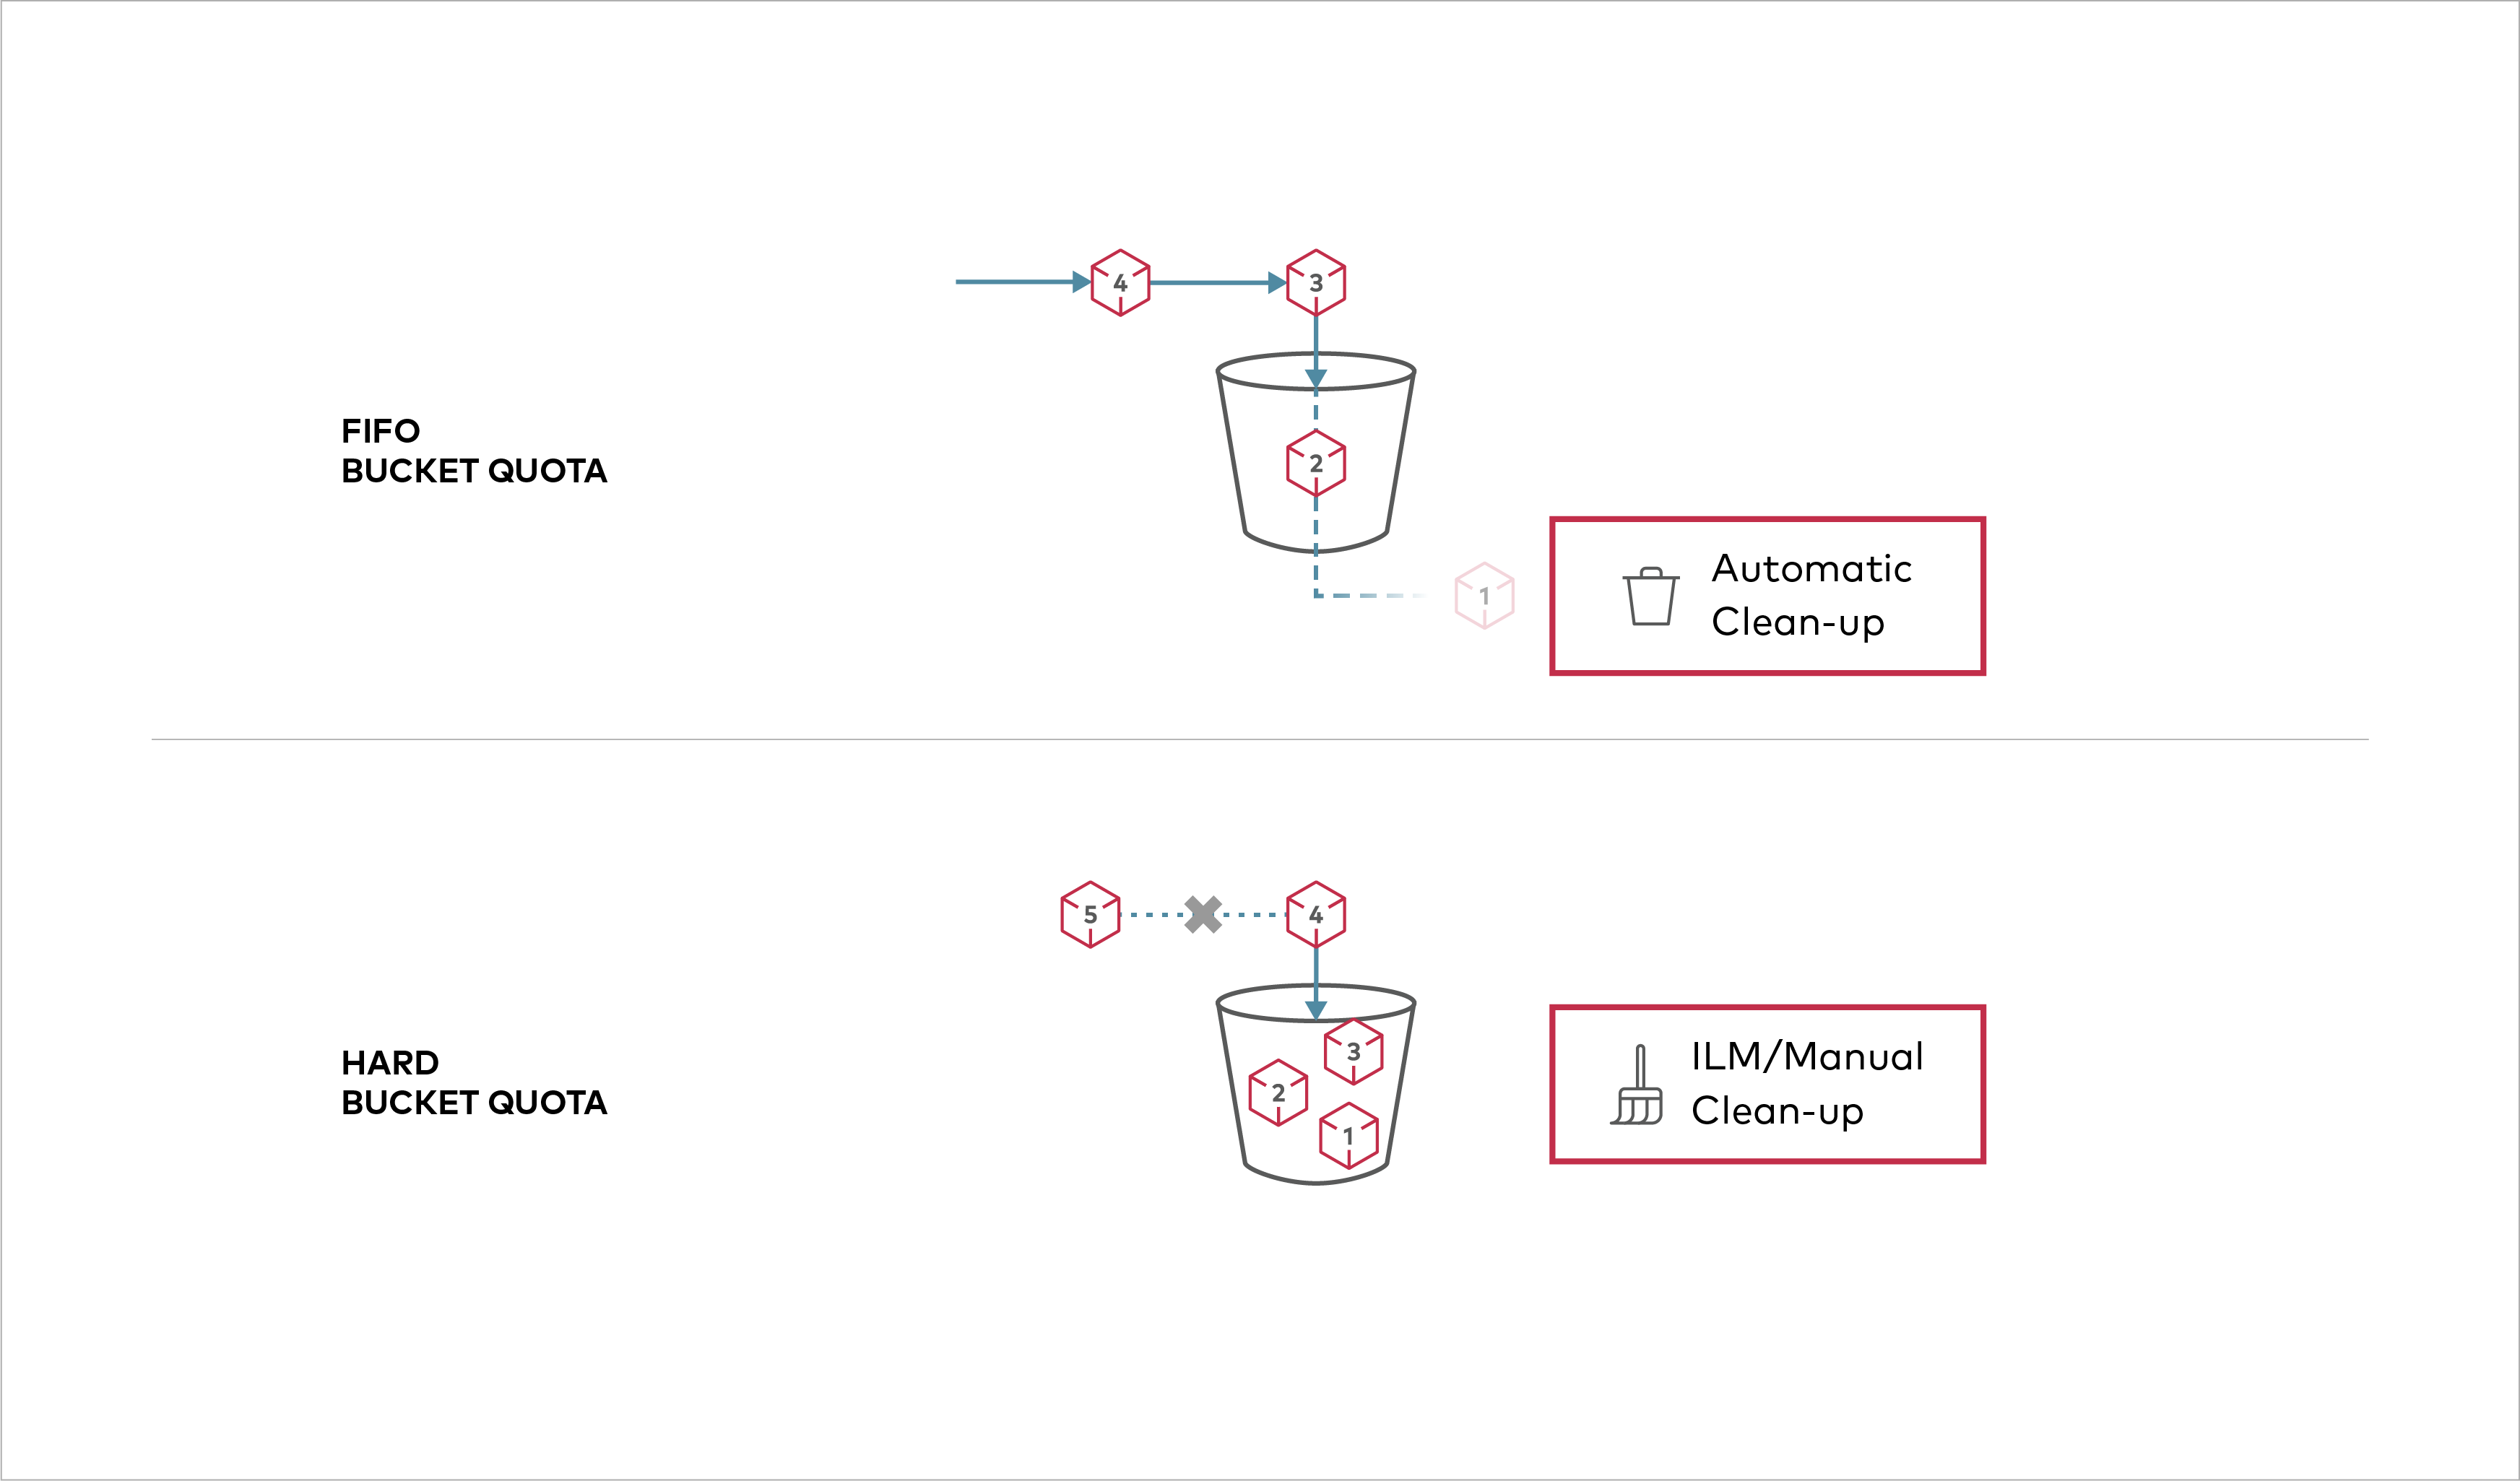 Buckets can be configured to have `Hard` quota - it disallows writes to the bucket after configured quota limit is reached. ## Prerequisites - Install MinIO - [MinIO Quickstart Guide](https://docs.min.io/community/minio-object-store/operations/deployments/baremetal-deploy-minio-on-redhat-linux.html#procedure).
Created: Sun Dec 28 19:28:13 GMT 2025 - Last Modified: Tue Aug 12 18:20:36 GMT 2025 - 1.1K bytes - Click Count (0) -
ci/official/containers/ml_build/cuda12.8_cudnn9.8.packages.txt
libcufft-12-8
libcurand-12-8
libcusolver-dev-12-8
libcusparse-dev-12-8
libcublas-12-8
libcublas-dev-12-8
libnccl-dev=2.25.1-1+cuda12.8
libnccl2=2.25.1-1+cuda12.8
# CuDNN: https://docs.nvidia.com/deeplearning/sdk/cudnn-install/index.html#ubuntu-network-installation
libcudnn9-dev-cuda-12=9.8.0.87-1
Created: Tue Dec 30 12:39:10 GMT 2025 - Last Modified: Fri Mar 14 22:45:44 GMT 2025 - 534 bytes - Click Count (0) -
docs/en/docs/tutorial/response-model.md
/// info

To use `EmailStr`, first install <a href="https://github.com/JoshData/python-email-validator" class="external-link" target="_blank">`email-validator`</a>.

Make sure you create a [virtual environment](../virtual-environments.md){.internal-link target=_blank}, activate it, and then install it, for example:

```console
$ pip install email-validator
```

or with:

```console
Created: Sun Dec 28 07:19:09 GMT 2025 - Last Modified: Sat Dec 20 15:55:38 GMT 2025 - 15.5K bytes - Click Count (0) -
ci/official/containers/ml_build/cuda13.0_cudnn9.12.packages.txt
libcufft-13-0
libcurand-13-0
libcusolver-dev-13-0
libcusparse-dev-13-0
libcublas-13-0
libcublas-dev-13-0
libnccl-dev=2.27.7-1+cuda13.0
libnccl2=2.27.7-1+cuda13.0
# CuDNN: https://docs.nvidia.com/deeplearning/sdk/cudnn-install/index.html#ubuntu-network-installation
libcudnn9-headers-cuda-13=9.12.0.46-1
libcudnn9-static-cuda-13=9.12.0.46-1
libcudnn9-dev-cuda-13=9.12.0.46-1
Created: Tue Dec 30 12:39:10 GMT 2025 - Last Modified: Wed Sep 10 16:44:14 GMT 2025 - 611 bytes - Click Count (0) -
compat/maven-embedder/src/main/java/org/apache/maven/cli/CLIManager.java
Created: Sun Dec 28 03:35:09 GMT 2025 - Last Modified: Wed Aug 06 04:56:48 GMT 2025 - 17.8K bytes - Click Count (0) -
fastapi/openapi/models.py
Created: Sun Dec 28 07:19:09 GMT 2025 - Last Modified: Sat Dec 27 12:54:56 GMT 2025 - 15.1K bytes - Click Count (0) -
ci/official/requirements_updater/numpy1_requirements/requirements.in
opt_einsum == 3.3.0
astunparse == 1.6.3
dill == 0.3.7
astor == 0.7.1
typing_extensions ~= 4.14.1
gast == 0.4.0
termcolor == 2.3.0
wrapt == 1.16.0
tblib == 2.0.0
ml_dtypes >= 0.5.1, < 0.6.0
auditwheel >= 6.1.0
# Install tensorboard, and keras
# Note that here we want the latest version that matches TF major.minor version
# Note that we must use nightly here as these are used in nightly jobs
# For release jobs, we will pin these on the release branch
Created: Tue Dec 30 12:39:10 GMT 2025 - Last Modified: Wed Oct 15 20:30:40 GMT 2025 - 1.2K bytes - Click Count (0) -
docs/pt/docs/tutorial/security/oauth2-jwt.md
## Instalar `PyJWT` { #install-pyjwt }

Nós precisamos instalar o `PyJWT` para criar e verificar os tokens JWT em Python.

Certifique-se de criar um [ambiente virtual](../../virtual-environments.md){.internal-link target=_blank}, ativá-lo e então instalar o `pyjwt`:

<div class="termy">

```console
$ pip install pyjwt

---> 100%
```

</div>

/// info | Informação
Created: Sun Dec 28 07:19:09 GMT 2025 - Last Modified: Wed Nov 12 16:23:57 GMT 2025 - 11.4K bytes - Click Count (0) -
docs/ko/docs/virtual-environments.md
///

//// tab | `pip`

<div class="termy">

```console
$ pip install "fastapi[standard]"

---> 100%
```

</div>

////

//// tab | `uv`

<a href="https://github.com/astral-sh/uv" class="external-link" target="_blank">`uv`</a>를 사용하는 경우:

<div class="termy">

```console
$ uv pip install "fastapi[standard]"
---> 100%
```

</div>

////
Created: Sun Dec 28 07:19:09 GMT 2025 - Last Modified: Fri May 30 13:10:41 GMT 2025 - 25.8K bytes - Click Count (0) -
docs/pt/docs/tutorial/security/first-steps.md
Entretanto, se você usar o comando `pip install fastapi`, o pacote `python-multipart` não é incluído por padrão.

Para instalá-lo manualmente, certifique-se de criar um [ambiente virtual](../../virtual-environments.md){.internal-link target=_blank}, ativá-lo e então instalá-lo com:

```console
$ pip install python-multipart
```
Created: Sun Dec 28 07:19:09 GMT 2025 - Last Modified: Wed Nov 12 16:23:57 GMT 2025 - 8.9K bytes - Click Count (0)